|
Writing Help Topics / Document Formatting Settings / Bulleted and Numbered Lists |
Send comments on this topic |
Use the Toolbar to Create a List
1.Select the paragraphs to which you want to apply list settings.
2.On the Write tab, in the Paragraph group, click Bullets or Numbering to create a bulleted or numbered list respectively.
Remark: The Bullets and Numbering buttons on the toolbar use the list template that was previously selected (or the default one) in the Bullets and Numbering dialog for a corresponding kind of list. Thus, you can always control which list template is used by these buttons and, moreover, you can customize the list template according with your needs.
Create a New Bulleted or Numbered List
1.Select the paragraphs to which you want to apply list settings.
2.On the Write tab, in the Paragraph group, click Bullets and Numbering in the Bullets button's drop-down menu.
3.Select the list type that you want to apply.
4.Click OK.
Modify a Bulleted or Numbered List Format
1.Select the paragraphs whose list settings you want to modify.
2.On the Write tab, in the Paragraph group, click Bullets and Numbering in the Bullets button's drop-down menu.
3.Select the list type that you want to apply.
4.Click OK.
Remove a Bulleted or Numbered List
1.Select the paragraphs whose list settings you want to clear.
2.On the Write tab, in the Paragraph group, click Bullets and Numbering in the Bullets button's drop-down menu.
3.In the dialog, click None.
4.Click OK.
Paragraph Level Parameter and Numbered Lists
Any paragraph has a Level parameter whose value is used for formatting numbered lists including single- and multi- level lists. This parameter is important for proper work of the counter in numbered lists since the word processor uses the list formatting settings from the corresponding list level which is stored in the associated list style.
To check or change the Level value of paragraphs:
1.Select the paragraphs whose level value you want to change.
2.On the Write tab, in the Paragraph group, click the Paragraph dialog launcher in the lower right-hand corner.
3.In the Paragraph dialog, you can set the Level value using the appropriate drop-down box.
4.Click OK.
To decrement or increment the Level value of paragraphs, you can also:
1.Select the paragraphs whose level value you want to change.
2.On the Write tab, in the Paragraph group, click Decrease Indent or Increase Indent, to decrease or increase the Level value respectively.
Remark: The Increase Indent and Decrease Indent buttons not only change the Level value of the selected paragraphs, but also change the indentation settings. If a selected paragraph belongs to a single-level list, a default step for the indentation is used. In case a selected paragraph belongs to a multi-level list, the indentation settings are taken from the list level of the corresponding list style.
Counter Behavior in Numbered Lists
You should control the following conditions that effect the counter behavior in a numbered list:
•Check the Level parameter of the paragraphs of a numbered list. If paragraphs have a Level value that does not exist in the list style, the counter will not work properly.
•All paragraphs of the same numbered list should have the same list style. To apply an existing list style to the selected paragraphs, you can double-click the list style you want in the Styles and Formatting pane.
•If a paragraph without a list style is inserted between other paragraphs that belong to a list, the word processor will consider them as two separate lists.
Note: If you need to start a new line in a paragraph that belongs to a list, you can insert a line break by pressing Shift+Enter.
•You can control the Start value of the counter in a numbered list:
The Bullets and Numbering dialog allows you to select either "Restart Numbering" or "Continue Previous List" option on the Numbered and Outline Numbered tabs. Also, the Customize button allows you to set the initial "Start From" value of the counter. If you change these parameters to fix the counter in a list, also ensure the other conditions are met.
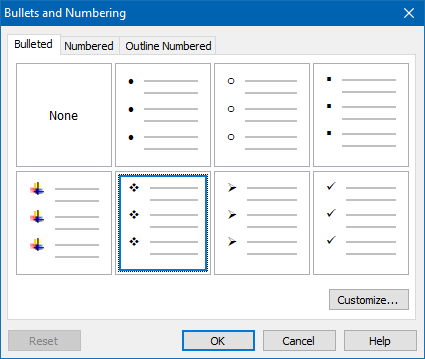
Bullets and Numbering Dialog
The Bullets and Numbering dialog allows you to select a list template that should be applied to the selected paragraphs. When you apply a list template, the word processor automatically creates paragraph and list styles that will store indentation and list settings from the list template.
You can customize a list template by selecting it and clicking the Customize button. Note that when you customize a list template, the changes will not effect any existing lists in the help project since, as mentioned above, the settings of exiting lists are stored in the corresponding styles.
To reset a list template to its default state, select it and click Reset.

Text Alignment for Bulleted and Numbered Lists
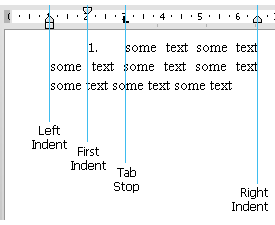
Bulleted and Numbered lists have alignment settings such as horizontal alignment of the list marker, position of the first tab space after the list marker which defines the space between the list marker and the text, and common left indent. The scheme below illustrates how this works in the word processor.

Use Dynamic Styles
HelpSmith's word processor stores all formatting settings in styles, which means that you can setup and re-use styles for content with similar formatting attributes.
When you apply a list template to selected paragraphs, the word processor automatically creates paragraph and list styles for the new list. The settings such as indents and tab stops are always stored in a paragraph style, and the list specific settings are stored in a list style.
Thus, you can quickly apply the list settings to other paragraphs by applying the appropriate styles available on the Styles pane. Also, when you need to modify formatting settings of different lists in your help project, you can modify the styles directly.
Related Links
•Modifying Paragraph Properties
Copyright © 2007-2025 HelpSmith.com